Getting Started
- How Plumsail HelpDesk works
- HelpDesk installation
- Quick HelpDesk configuration
- License Installation
- YouTube Channel
- Community forum
Configuration guide
- Email settings
- Triggers
- Web widget
- Tab for Microsoft Teams
- Customize widget forms
- Customize ticket and contact forms
- Customer satisfaction survey (CSAT)
- Scheduling of tasks and reminders
- SLA policy
- Localization
- Appearance settings
- Color theme
- Statuses customization
- Reports customization
- Ticket numbering customization
- Update HelpDesk
- Uninstall HelpDesk
User guide
- Home
- Ticket management
- Ticket search
- Knowledge base
- All tickets
- Contacts
- My contact
- Reports
- Canned responses
- Ticket merging
- Ticket splitting
- SLA policies
General
- Version history
- Data protection and security
- Data center location
- Licensing details
- Billing and subscription management
- Support plans
- Status page
Power Automate (Microsoft Flow) and Public API
How to
- Notifications
- Automations
- Automatically evenly assign tickets to agents
- Skill-based ticket assignment
- Assign tickets based on weights
- Assign ticket to first agent who replies
- Assign ticket to multiple agents
- Assign ticket to specific person
- Assign ticket based on forwarding address
- Detect changes made by others
- Edit ticket’s properties from mailbox
- Reassign ticket from disabled user
- Start a workflow with a trigger
- Close tickets if customer hasn't replied
- Create a new ticket in HelpDesk from a Twitter mention
- Submit tickets from an online form with the help of Power Automate (Microsoft Flow)
- Use SharePoint HelpDesk with Microsoft Teams for employee onboarding
- How to forward a ticket from one HelpDesk instance to another
- SLA
- Ticket management
- Custom forms, charts and views
- Advanced
Use SharePoint HelpDesk with Microsoft Teams for employee onboarding
In this article, we’ll take a look at a couple of tricks you can use to partially or fully automate the onboarding process with the help of Plumsail HelpDesk, MS Teams, and Power Automate. When you add a new member in MS Teams, an automated process will assign a new HelpDesk ticket to start the onboarding and notify the new employee in the Chat:
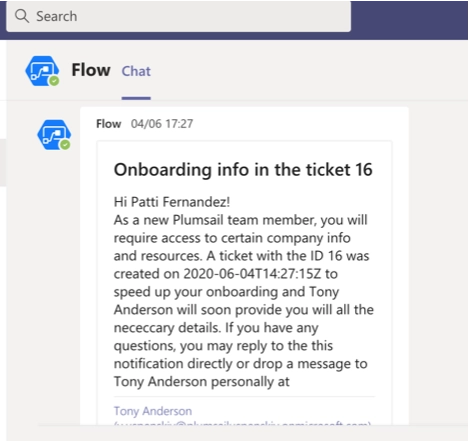
Table of contents
Create a ticket when a new user joins MS Teams channel
MS Teams is a a communication and collaboration hub for the users of your Microsoft 365 tenant to chat, hold video meetings, share files, etc. Power Automate (formerly Microsoft Flow) is a flexible instrument for creating automated processes. It can help integrate different services and make them interact with each other. Plumsail Helpdesk has a connector to interact with Power Automate that help you automate routine and repetitive actions.
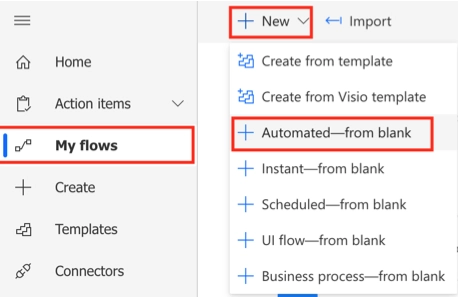
When you add a user to a particular MS Team, you can use it as a trigger to start a Powe Automate flow. Sign in to a Power Automate site (or create an account) and navigate to “My Flows”.
Then create a new Flow, choose the type as Automated from blank.
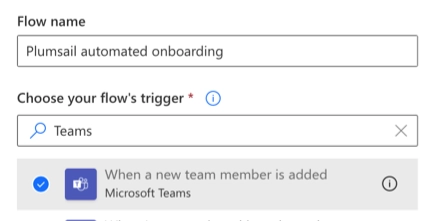
Name it and find a trigger from the MS Teams connector:
In the trigger action, pick up the correct team that you’ve added the new user to:

This action will yield User Id - an identification that we can use to locate all the user’s data that we might need. Just add a Get user profile action from the Microsoft 365 users connector and use the User Id to get it:

Additionally, we will need a prepared Checklist with the company resources, documents, and info that your new employees need to be provided access. You can store the checklist as a separate file. We’ll use the OneDrive connector to get it, but you can use any connector you want. MS Power Automate supports SharePoint, Google Drive, DropBox, and other popular Cloud services.

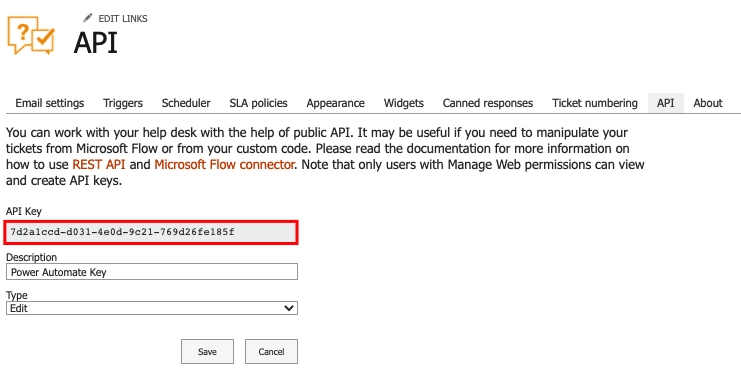
Plumsail HelpDesk has its own connector to work wit Power Automate. To use it, you need to only to navigate to the Power Automate & API tab on the Settings page and create a new API key. Please give it a name and choose Edit permissions level. Copy the key:
Note
You can find more info on how to use the HelpDesk Power Automate connector in a separate article.
After this, you can add the Create a ticket action. We will use this to create a HelpDesk ticket with IT Department to provide the new employee all the necessary access to the company resources. Additionally, you can add as many tickets as you want in a single flow: you might also want to contact the HR Department to provide some orientation info, Security for the building pass, etc. For this, we’ll only need to know the emails of the employees (or groups) responsible for the process. Here’s how a template of such a ticket might look like:
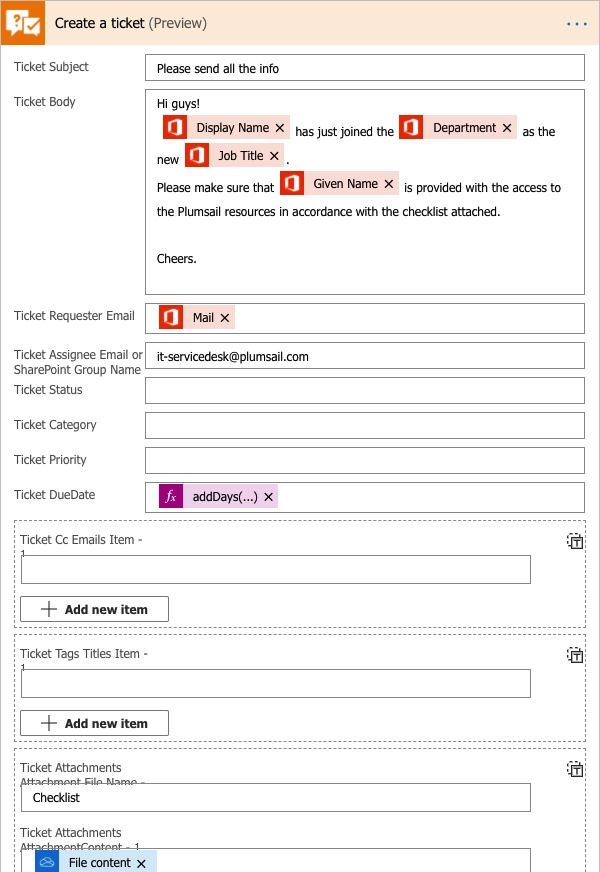
Please note that we’ve used all the info dynamically from the previous step and only the ticket assignee (the IT service desk in this case) is hardcoded. We’ve also used the following Expression to set the ticket due date to tomorrow: “addDays(utcNow(),1)”.
Notify new employee about onboarding steps
Finally, you may use MS Teams to send a message to your new colleague and notify other Team members of the reinforcement. First, we’ll use the Post a message as the Flow bot to a user action to not let the user miss the ticket. This step might be a bit excessive as the employee will get the notification email from the HelpDesk anyway.
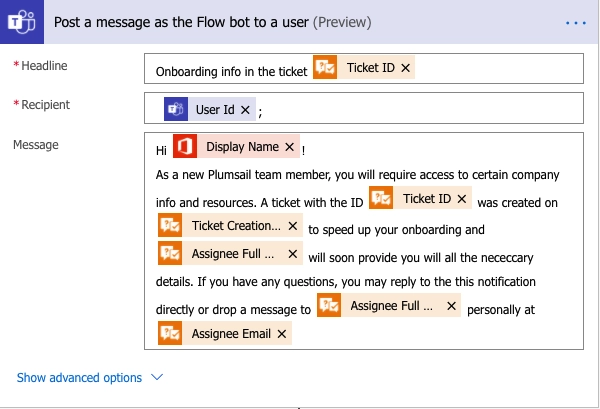
Note that, like in the previous steps, all the necessary info is acquired dynamically. The Create a ticket action yields all the info about the ticket we might need.
Introduce the new employee to the company
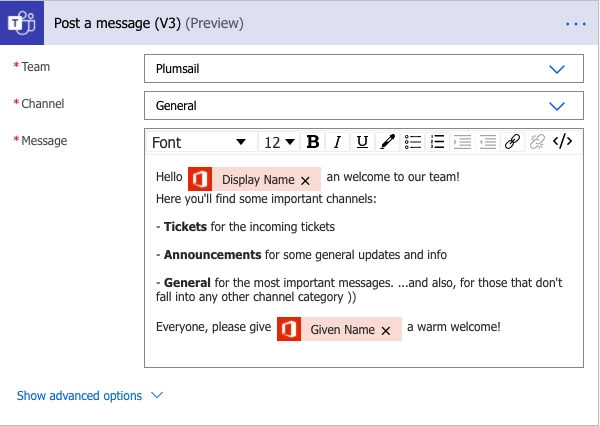
We’ll also post a message in the General Team chat for others to greet the new colleague:
